How to Forward an Email Easily in 2024
Email forwarding is the action of re-sending an email to one or multiple recipients. It’s one of the most useful features for ensuring a steady flow of information when working in a group.
There are two main types of email forwarding – manual and automatic. Manual forwarding means sending messages from your inbox to another email address individually. Whereas auto-forwarding redirects all incoming emails to another mailbox based on certain criteria.
This article will cover how to forward email messages using three email programs – Gmail, Outlook, and Hostinger’s hPanel. We’ll also explain when email forwarding may be most beneficial and share several tips on how to forward emails correctly.
Be sure to carefully go through each step, as the forwarding methods vary depending on the email program. Now, let’s dive in.
How to Forward an Email Using Gmail
Gmail provides two methods of forwarding an email message – manual and automatic forwarding. This section will explain both approaches. While we’ll use a computer interface, the steps are very similar when using the Gmail mobile app.
How to Forward an Email Manually
- Log into your Gmail account, navigate to the menu bar, and click Inbox.
- Find and open the email message you want to forward to someone.
- Click the Forward button.

- Enter the email address of the recipient in the To field. If you want to add more than one address, separate them with commas.

- You can also add Cc (carbon copy) and Bcc (blind carbon copy) recipients by clicking the respective button.
Both To and Cc recipients can see the list of email addresses attached to the email you forward. Meanwhile, the list is not visible to Bcc recipients.

- If you need to write a message above the forwarded email, do so above the Forwarded message text in the body of the email.

- If the message you want to forward contains an attachment and you wish to remove it, simply click the x button next to the attachment. Conversely, if you want to add a new attachment, click on the Attach files symbol, as shown below.

- Once you’ve finished editing the message, click the Send button.
How to Set Up Automatic Forwarding
The following steps will show you how to set up your Gmail account to automatically forward multiple emails to another email address. However, keep in mind that this method only works on a computer.
- Open your Gmail inbox and select the Settings gear icon on the page’s top right corner.

- Select See all settings.

- Navigate to the Forwarding and POP/IMAP tab. From there, click Add Forwarding Address.

- Enter the forwarding email address and click Next.

- A new window will pop up. Make sure that the forwarding address is correct and click Proceed.

- Gmail will send a verification email to your inbox. Simply click on the verification link or insert the code as requested.

Now, Gmail will automatically forward all your new email messages to the address you have provided. If you want to stop the forwarding, click Disable forwarding.
How to Enable Filters to Forward Specific Emails
Another option is to forward mail messages by using filters. In addition to setting the criteria for a specific message you want to forward, Gmail filters help block unwanted emails in your inbox.
While the previous method can only forward messages to one specific address, you can send emails to multiple addresses using this method. Follow these steps to start:
- Click Settings -> See all settings. Then, choose Filters and Blocked Addresses.
- Select Create a new filter.

- Fill the fields with the criteria for the emails you want to forward and select Create filter.

- The emails that fit the criteria you entered will appear. Next to the search bar, click the dropdown icon to show more options.
- Tick Forward it to and choose your desired email address or Add forwarding address.

- Select Create filter to finalize the setting. Repeat the same process to enter multiple addresses you want to forward to. Note that the filter will only apply to new incoming emails.
How to Forward an Email Using Outlook
Outlook also provides manual and automated email forwarding. We’ll show the steps on the web app, but the same process will work on the phone app as well.
How to Forward an Email Manually
- Log into your Outlook account on the web app and go to your inbox folder.
- Find and open the message you wish to forward.
- The reading pane will appear with the content of the email. Continue by selecting the Forward button.

- Enter the email address of the recipient at the top. Use commas to separate multiple addresses in the To, Cc, or Bcc sections. To give more context or clarity, add a message on top of the original email content.

- When you’re done, click the Send button.
How to Set Up Automatic Forwarding
Outlook’s automatic mail forwarding works based on specific message rules. It will only forward messages that meet the criteria. Follow these steps to start setting up new message rules:
- Open your Outlook inbox and select the Settings gear icon on the top right corner of the page.

- Select View all Outlook settings.
- Navigate to Mail -> Rules and Add new rule.

- Name the rule whatever you want, for example, “Automatic forwarding.” On the Add a condition field, select Apply to all messages. Then, select Forward to from the Add an action drop-down menu.
- A new field will appear. Continue by filling in the forwarding address.

- Click Save to keep the settings.
Note that you can adjust the condition and action to fit your purpose. For example, if you want to forward a message as an attachment, change the action to Forward as attachment. Similarly, you can also change the condition to another value you see fit.
How to Forward and Email Using Hostinger’s hPanel
If you have a Hostinger email account, take advantage of the built-in Email Forwarders feature in hPanel to automatically forward emails.

Here’s how:
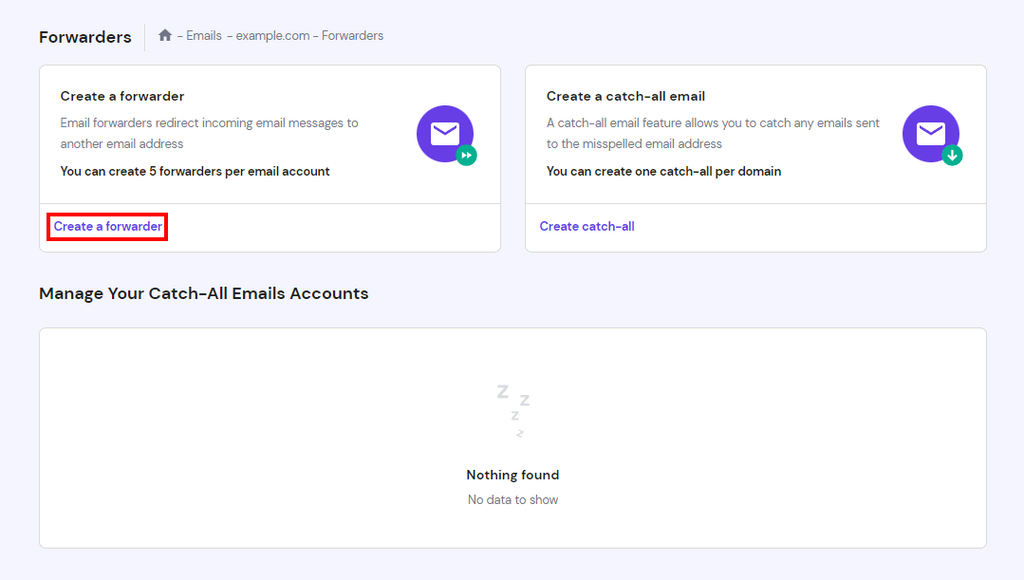
- Access the hPanel dashboard, and go to Emails -> Email Accounts.
- Next, click on your domain name. The system will open your Email Account dashboard. From there, click the Forwarders menu and choose Create a forwarder.
- A window will appear to let you choose a mailbox and redirect emails to a forwarding address. Proceed by filling in the fields accordingly.
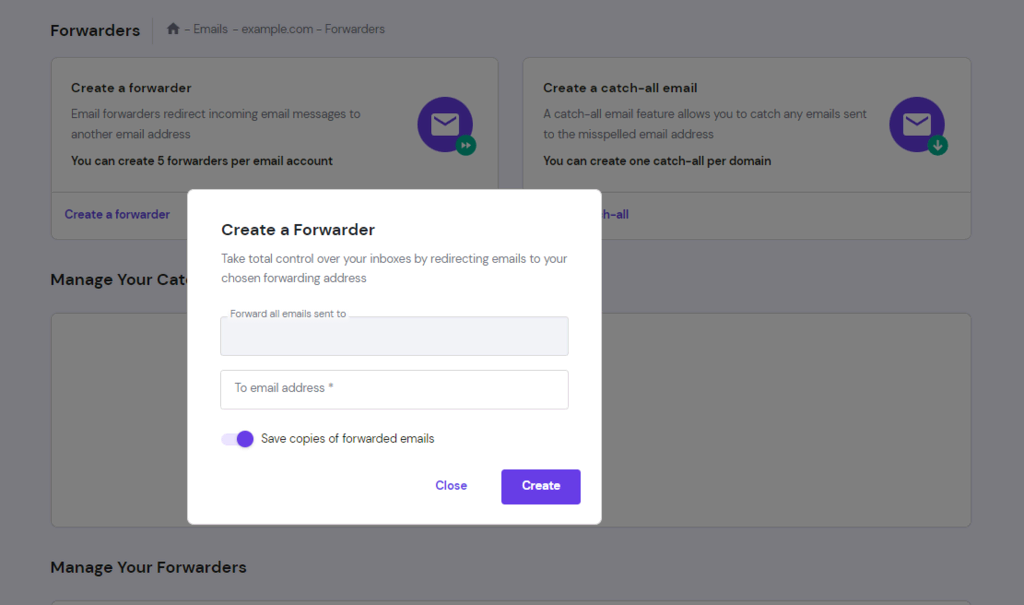
- Click Create to save changes. A list of active email forwarders will appear under the Manage Your Forwarders section.
Why Forward an Email
Forwarding is one of the most basic and widely used email features. It can make various communication processes smoother and more organized. Let’s look at several cases where forwarding an email can be the best course of action.
Telling the recipient to know or act upon the message in the original email.
Usually, you would forward an email to inform someone who wasn’t included in the original email chain. This way, you can inform them about the message or ask them to act.
Instead of composing a new email and echoing the content from the original message, forwarding offers a more straightforward and faster alternative.
Including attachments from the original email.
The forwarding feature comes in handy for sharing attachment files from an email you received. When you forward an email, the attachment files will be sent along with the message. It skips the hassle of saving the files to your computer, composing a new email, and re-uploading files.
Providing context for the forwarded messages.
When forwarding an email, you can add a message above the forwarded email or message thread. It will provide the recipient with context, reducing the risk of a misunderstanding.
Moving to a new email address.
Setting up automatic forwarding is helpful when you switch to a new email account. Start creating new message rules to redirect incoming emails to your new account. This way, when people send messages to your old email address, you will still receive them in your new mailbox.
Email Forwarding Tips
Now that you’ve learned how to forward emails using three different platforms, you might wonder if there’s a set of rules you have to follow. While there are no official guidelines, here are some general tips to help you along:
- Make sure that forwarding the email is the right move. Before you forward a mail message, make sure that including the original content in its entirety will be seen as appropriate and valuable.
- Add a comment. A forwarded mail with no additional message can be confusing. Always include a message to the recipient explaining why they’re receiving this email and what the person should do with the information.
- Delete unnecessary and sensitive information. Be careful when forwarding a long email thread. It might contain many topics that aren’t relevant or include sensitive data that the recipient shouldn’t see.
- Take advantage of Bcc. Blind carbon copy recipients won’t be able to view other email addresses apart from their own. This feature makes the email cleaner and protects the privacy of everyone involved in the thread.
- Fix the subject line. You might notice that your email client will add abbreviations like “Fw” or “Fwd” into the subject lines of forwarded emails. As the sender, you have the option to delete them or change the subject entirely to make it look more professional.
Conclusion
In this guide, we’ve shown you how to forward an email using Gmail, Outlook, and hPanel and explained why email forwarding can be beneficial and how to do it properly.
When you want to forward a message, always explain why the recipient is receiving it. Also, make sure there is no sensitive data or information that the person on the receiving end shouldn’t see.
All in all, we hope this article has helped you understand how email forwarding works. Be sure to follow the general best practices to make the process smoother and more professional. If you have any thoughts or feedback, feel free to share them in the comments below.
Check Out These Email Tutorials
How to Setup Outlook
How to Setup Gmail
How to Add Emails on Mac

Hasna is passionate about tech, culture, and the written word. She hopes to create content that helps people succeed on the web. When not writing, rearranging, or polishing sentences, she enjoys live music and overanalyzing movies.

Comments
October 21 2021
Using hPanel and I do not see Forwarder. I see internal forwards but that's not what I need.
October 27 2021
Hi there, can you clarify a bit what forwarder are you looking for? From hPanel, you should be able to setup both a forwarder which would redirect all emails from one email account to another and an autoresponder (under Automatic Reply section).
December 03 2022
I want to know how to delete a forwarding email address in hostinger webmail.
December 09 2022
Hey! You can easily delete any existing forwarders in the Forwarders section of your hPanel. You can refer to this article to learn how to manage email forwarders.